The Exposure Triangle and Animal Photography
The exposure triangle is a foundational part of photography know-how, but knowing and applying are different things. However, nearly everything you read about it uses landscape and human portrait photography as examples.
Here are some insights into what the exposure triangle is and how I apply it in reptile and amphibian photography. A few disclaimers: First, this is how I have interpreted the things I have learned and this isn’t about the details or the super science-y and technical aspects. I may be a little off from the textbooks on a few points. Second, I personally feel a flash is necessary for animal photography so these concepts and applications are all under the assumption you have an off-camera flash.
Aperture, Shutter Speed, and ISO
These three things make up what is known as the exposure triangle and working together, they help make your images sharp and properly exposed. Working with animals, these three settings have some additional things you’ll need to consider and that’s what I’m here to talk about.
Aperture
What is it?
Aperture is that number with the ‘f/‘ in front of it commonly called f-stop. What you’re controlling is how open or closed the lens’ iris is. Out of the three parts of the triangle, aperture, in my opinion, has the most variety of influence over your image.
What does it impact?
It primarily controls two things in your photo; how much light reaches the camera’s sensor and how much of your subject is in or out of focus. It’s important to note that when you change your f-stop, light and focus are inversely related. So, the smaller the f-stop number, the more light reaches the sensor making your image brighter but more of your subject will be out of focus. On the flip side, the higher the f-stop number the darker your image will be but more of your subject will be in focus.
Depth of field
The amount of your image that is in focus is called your depth of field. You will commonly hear people say that you have a shallow or wide depth of field and that indicates whether you have a little or a lot of your image in focus.
Although you might think a wide depth of field gives you the sharpest images, that isn’t really the case. The way I think about it, is that you have to create a reference point for what out of focus looks like in your image in order to show what in focus looks like. Embrace the blur, but just make sure the focal point of the image is sharp.
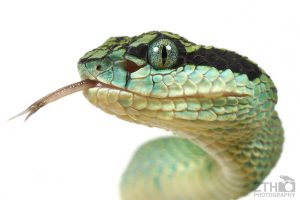
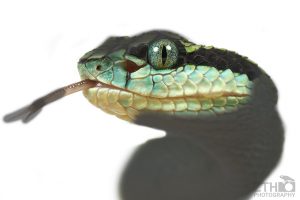
This is an image I often get feedback as being very sharp with a lot of great details, but nearly all of it is actually out of focus. It’s just the sharpest where I want it to be and that’s what counts. The bottom image has the out of focus areas in gray.
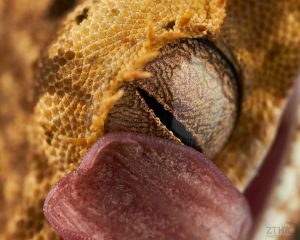
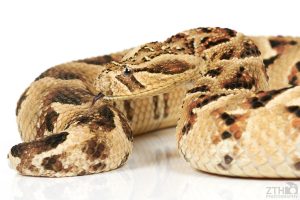
In addition to the impact your f-stop has on your depth of field, the distance from the subject is also a factor to consider. Especially with animals, you are often very close doing macro work, or far away because the animal is dangerous. Much like light and depth of field, distance and depth of field are somewhat inversely related. The closer your are to a subject, the shallower your depth of field and the farther away, the wider your depth of field. So, for the animals you can’t get close to, you can get away with a smaller f-stop and still have a wide depth of field. For the animals you want to get really close to, you will need a higher f-stop to keep things in focus.
In the top photo I am using a 2:1 macro lens and am only a few inches from the subject so I am shooting at f/11 but you can still see the depth of field is very shallow (a few millimeters) despite the higher f-stop number. In the bottom photo, I am a few feet away from the subject shooting at f/9 but the depth of field is wider (several inches) than it appears at f/11 in the previous shot.
There are ways to calculate exactly how much depth of field you have given your camera settings and distance to the subject, but for animal photography, I don’t find that very helpful. Animals move so much and are such different shapes and sizes that I can’t do the math quickly enough to use it. There is one concept though that will help you consistently make the best of what you have based on whatever settings you’re using. Your depth of field is a measurement based on the point you focused your camera on. The image will be the sharpest at that point, but the term depth of field itself tells you that you have areas of sharpness beyond that single focal point. The concept to remember is that apart from the focal point, you have the most sharpness or depth of field behind that point.
What f-stop do I start with?
Every lens has what’s commonly called the ‘sweet spot’ which refers to the aperture setting where the lens will produce the sharpest image. It varies, but it is generally 2-3 full stops from your widest aperture. So, if the lens is a maximum of f/4, it is somewhere between f/8-f/11. Usually you can do a quick Google search for your lens and someone has the exact f/stop to achieve your lens’ ‘sweet spot.’ If you’re ever unsure what aperture to start with, this is a good choice.
Things to consider when working with animals
Eyes are almost always going to be the focal point of your image. Different than humans however, animal eyes often stick out from their head, so getting the eyes and the face in focus your depth of field becomes a little harder. Knowing that you have the most depth of field behind the focal point, you’re almost always better off picking the closest part of the animal’s eye to you as the focal point so that you get the eye and some of the face sharp. It is best to use single point auto-focus mode on your camera to help achieve this.
Shutter speed
What is it?
This is probably the easiest one in the exposure triangle to understand. This is simply controlling how long the shutter exposes the camera’s sensor and is the fraction number you see on the back of your camera (e.g. 1/150).
What does it impact?
How much light reaches your cameras sensor and, in addition to your flash, it helps stop motion. The fraction is in seconds so 1/150 means the shutter exposes the sensor for 1/150th of a second. The larger the denominator, the faster the shutter. Unless you have incredibly steady hands, most people cannot shoot handheld at less than 1/100 without starting to see some blurriness in their images.
Things to consider when working with animals
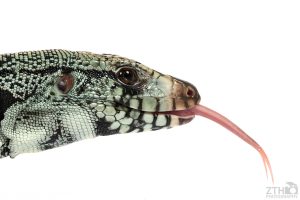
Using a flash and fast shutter speed is how to get that tongue flick shot everyone wants. To avoid getting tech-y, your flash has what is called a maximum sync speed which means that you can only set your shutter speed so fast before the flash can’t light up the image. Most maximum sync speeds will be 1/200th. There is something called high speed sync but we won’t get into that here. To keep it simple, set your shutter speed to the maximum sync speed and use flash power and ISO to help dial in the exposure. Just set it and forget it unless you’re trying to show some blurred motion in your shots. The image below is at 1/200 which is the maximum sync speed for my strobes.
A little bit more about flashes
What are they for?
A lot of people view a flash as a light source, which it is, but with animal photography it’s really about helping you stop motion more than it is making things bright. Think of the strobe lights at a concert and how they make the crowd look like they’re moving slower because you only see snippets of their movements illuminated. That is why you need a flash, to recreate that effect when a snake or gecko sticks their tongue out so your camera only sees brief moments of movement.
Things to look for when buying a flash
Flashes have a lot of ‘stats’ that go with them. For animal photography, you want something with a fast recycle time (i.e. how fast you can fire it in succession) and a short flash duration. The short flash duration is what helps you stop motion but most all flashes will have similar durations until you start getting up into more ‘pro level’ (aka expensive gear).
Should I be concerned using a flash with animals?
In general, no. Lightning and the sun exist in the wild and your flash doesn’t compare to those. You will see animals constrict their pupils to adjust, but I rarely see animals flinch or run away from the flash. The only time I suggest you be more cautious about a higher powered light would be when working with albino animals, as they are genuinely much more sensitive to bright lights.
ISO
What is it?
How sensitive your camera’s sensor is to light. There’s some science-y stuff to it but it likely won’t completely change your view of photography. Your camera will most likely put a number next to ISO so it should be pretty obvious where it is.
What it impacts?
Two things: how light or dark the image is, and how grainy the image appears. I view ISO and aperture as partners in crime when it comes to sharpness. Grain can give a photo a unique look, but if you want images as sharp and realistic as possible, ditch the grain. Grain appears at higher ISO settings so you’ll want to stick as low as you can. Most new mirrorless SLRs can be around 1000 ISO before you start seeing super strong grain but most DSLRs start to see it creep in around 800. Generally rule of thumb I stick to is to stay under 400 ISO.
Things to consider when working with animals
Many reptiles and amphibians already have really fine texture to their skin and scales so adding any grain to the image quickly gets out of control. Use the lowest ISO you can get away with and compensate for the darkness with a combination of your flash and aperture.
Ok, How Do I Start?
So now that you know a little bit about a lot, what do you do? Personally, I barely touch any of this and use almost the same settings for all the shots I take. I know right, you read all of that just for me to say forget it. Not quite.
Here is how I boil all of the content above down to the way I start a shoot. I set my shutter to the max sync speed, set my aperture to my lens’ sweet spot, set my ISO to 80 or 100, and put my flash at half power. I take a couple shots to see what the images look like as every shooting environment is different and then, using what I know about the exposure triangle, I make some small adjustments to dial in the exposure to where I want. Keep in mind, that all of these settings work together so when you change one thing, you should expect to need to change another.
I know you might be ready to reach for your camera, but keep this last point in mind. It’s knowing how this all works and deciding what small adjustments to make that will help you create your own style. You can do exactly what I said above for my starting place, and your images won’t look like mine just like mine won’t look like yours. That’s what awesome about photography. It’s the small in the moment changes we choose to make that can’t be written down that allows everyone’s work to be unique. My hope is that this guide has given you a better understanding of how, when, and why to make those small changes.